Saturday, 28 October 2023

Pom Pom: Meeresmüllabfuhr // Spazzini sottomarini // Underwater garbagemen

Klares Wasser, oft wie ein Spiegel oder wie Glas, alle Schattierungen von blau, grün, türkis... während das Meer hier definitiv ein Hingucker ist, gibt es auch leider eine erhebliche Menge an Müll. Und deshalb ist einer der "Arbeitstauchgänge" von tracc die "Unterwasserreinigung" - oder, wie wir es für diesen Beitrag gerne nennen: Action für die Meeresmüllabfuhr 💪

Wie funktioniert's? Ganz einfach: Wir gehen Tauchen (Überraschung ?!), entlang eines Riffs und vor allem um und unter den Stegen der nahegelegenen Resorts, bewaffnet mit Handschuhen, einer Tasche und etwas zum Schneiden (Schere, Messer, Cutter...) und sammeln jeglichen Müll ein. Unser Hauptaugenmerk liegt auf den Angelschnüren, mit denen einige der Einheimischen ihr Abendessen aus dem Meer holen. Wenn sich diese Angelschnüre in den Korallen verheddern, bleibt den Hobbyfischern meist nichts anderes übrig, als diese abzuschneiden und im Meer zu lassen. Angelschnüre bestehen natürlich aus Plastik und verschmutzen daher die Umwelt. Schlimmer noch, sie sind auch potenziell tödlich für Meerestiere, die den Haken oder die Leinen verschlucken oder sich darin verfangen (Schildkröten können beispielsweise nicht mehr zum Atmen auftauchen).


Acqua limpida, spesso come uno specchio o come di vetro, tutte le sfumature del blu, del verde, del turchese... se il mare qui è decisamente bello da vedere, purtroppo c'è anche una notevole quantità di spazzatura. Per questo una delle "immersioni di lavoro" di tracc è la "pulizia subacquea" o, come ci piace chiamarla per questo post: azione per gli spazzini sottomarini 💪

Come funziona? Semplice: andiamo sott'acqua, lungo la barriera corallina e soprattutto intorno e sotto i moli dei resort vicini, armati di guanti, un sacchetto e qualcosa per tagliare (forbici, coltelli, cutter...) e raccogliamo tutti i rifiuti. Ci concentriamo soprattutto sulle lenze da pesca, che i locali usano per pescare la loro cena dal mare. Quando queste lenze si impigliano nei coralli, il più delle volte, i pescatori non hanno altra alternativa che tagliarle e lasciarle in mare. Chiaramente sono fatte di plastica e quindi sono dannose per l'ambiente. Peggio ancora, sono anche potenzialmente letali per gli animali marini che potrebbero ingoiare l'amo o le lenze o rimanervi impigliati - non potendo risalire in superficie per respirare, nel caso delle tartarughe.


Clear water, often like a mirror or like glass, all shades of blue, green, turkey... while the sea here is definitely a looker, unfortunately there's also a significant amount of garbage. And hence one of tracc's "work dives" is "Underwater cleaning" - or, as we like to call it for this post: action for the underwater garbagemen 💪

How does it work? Simple: we go underwater, along the reef and especially around and under the jetties of nearby resorts, armed with gloves, a bag and something for cutting (scissors, knives, cutters...) and we pick up any trash we find. Our focus is mostly on fishing lines, which the local guys use for drawing their dinner from the sea. When those fishing lines get entangled in corals, most of the time, there's no alternative for the make-shift fishermen but to cut them and leave them in the sea. Clearly, they are made of plastic and are therefore bad for the environment. Worse, they are also potentially deadly for marine animals which might swallow the hook or lines or get entangled in it - not being able to surface for breathing in the case of turtles.


Manchmal liegen die Angelschnüre schon sehr lange unter Wasser, und Korallen sind um sie herum gewachsen und haben manchmal Teile davon in ihre Struktur aufgenommen. Manche Stücke sind recht kurz, andere sind mehrere Meter lang. Nach einigem Ziehen und Fluchen (aus offensichtlichen Gründen eher nicht hörbar 😂) schneiden wir deshalb die losen Enden ab, ziehen alles heraus, was möglich ist und belassen den Rest in der Koralle. Kritischer wird es - was oft vorkommt - wenn der Haken noch an der Angelschnur befestigt und dazu noch rostig ist; das erfordert besondere Vorsicht, trotz Arbeitshandschuhen. Apropos Vorsicht: Da sich im Sand und in den Korallen viele Fische und andere potenziell gefährliche und/oder giftige Meeresbewohner verstecken können, müssen wir genau hinsehen und Sand wegwedeln, bevor wir etwas anfassen.

Beim Putzen besteht aber immer die Chance, auch ein paar coole Tiere zu sehen. Wir waren schon Auge in Auge mit mehreren Pfeifenfischen, einem sehr schönen Nudibranch (s. Video weiter unten), einem kleinen Hai (leider tot, in einem Korallenblock liegend 😢), Schildkröten, einem Schwarm junger Gestreifter Korallenwelse, einem Skorpionfisch... Neben der Genugtuung über eine volle Tasche Müll gibt es also auch das von uns Tauchern hoch geschätzte Element der tierischen Überraschung 😎 - und, wieder an Land, den schrecklichen Geruch von verwesenden Fischen und anderem fauligen Zeug. 🤢🤮


A volte le lenze sono rimaste sott'acqua per molto tempo e i coralli sono cresciuti intorno, a volte incorporandone alcune parti nella loro struttura. Alcuni pezzi sono piuttosto corti, altri sono lunghi diversi metri. Quindi, dopo aver strattonato e imprecato (in silenzio per ovvie ragioni 😂), tagliamo le estremità libere, tiriamo fuori tutto ciò che è possibile e lasciamo il resto nel corallo. Probabilmente la parte più difficile è quella - che capita spesso - in cui l'amo è ancora attaccato e arrugginito; questo richiede attenzione extra. E a proposito di attenzione: poiché nella sabbia e nei coralli possono nascondersi pesci e altre creature marine potenzialmente pericolose e/o velenose, è necessario guardare e "sventolare" prima di toccare qualcosa, anche se indossiamo i guanti.

Durante le pulizie c'è sempre la possibilità di vedere qualche animale carino. Ci siamo già trovati a tu per tu con diversi pipefish, un nudibranco molto bello (vedi video sotto), un piccolo squalo (purtroppo morto, all'interno di un blocco di corallo 😢), tartarughe, uno sciame di giovani pesci gatto dei coralli, uno scorfano... Quindi, oltre alla soddisfazione di una borsa piena di spazzatura, c'è anche l'apprezzato elemento di queste sorprese 😎 - e in più, una volta tornati al camp, l'orribile odore di pesce in decomposizione e altra roba marcia. 🤢🤮


Sometimes the fishing lines have been underwater for quite a long time and corals have grown around them, sometimes incorporating parts into their structure. Some are rather short pieces, others are several meters long. So after some tugging and cursing (silently for obvious reasons 😂), we cut the loose ends, pull out whatever possible and leave the rest. Probably the most tricky part is - which happens often - when the hook is still attached and rusty; that requires extra care. And talking about extra care: as many fish and other potential dangerous and/or poisonous sea creatures might hide in the sand and corals, we need to look and waft before we touch anything - although we are wearing gloves.

While cleaning there is always the chance to see some cool animals, too. We were already eye to eye with several pipefish, a very nice nudibranch (see video below), a little shark (unfortunately dead, lying in a coral mount 😢), turtles, a swarm of juvenile striped catfish, a scorpion fish... So besides the satisfaction of a full bag, there is also the appreciated element of animal surprise 😎 - plus, once back on land, the horrible smell of decaying fish and other rotten stuff. 🤢🤮


Der tote Hai // Lo squalo morto // The dead shark 


Nudibranch 


Gestreifte Korallenwelse // Pesci gatto dei coralli // Striped catfish


Monday, 23 October 2023

Pom Pom - Unterwasserwelten // Mondi marini // Underwater worlds

Oft bleibt nach unseren Arbeiten unter Wasser noch genug Zeit und Luft, um die Meereswelt um uns herum zu erkunden. Außerdem gibt es über die Woche hinweg verstreut immer wieder "Fun Dives", also Tauchgänge, bei denen wir einfach "normal" tauchen gehen und einen Tauchplatz genießen, auf Entdeckungsreise gehen. Meist sind wir da mit unseren GoPros unterwegs, machen Fotos und Videos. Zwar können wir damit nicht wirklich die Atmosphäre, Farben und Eindrücke so einfangen, wie wir sie erleben, aber die Aufnahmen bieten uns eine Art Erinnerungsstütze und Euch - vielleicht - einen kleinen Einblick in diese (im Vergleich zu anderen Gebieten der Erde) noch weniger erkundete Welt. 

Zudem haben wir nach jedem Tauchgang einen Fisch oder ein anderes Meerestier, dessen Namen wir in einem der Fachbücher durch nachschlagen herausfinden möchten - das ist ein Großteil des Spaßes und macht das Tauchen interessant. Zwischenzeitlich sind wir ganz gut darin geworden, Fische bestimmen Familien zuzuordnen und sind immer wieder fasziniert, wie mannigfaltig, kurios und erstaunlich die Welt aller Meerestiere ist. Wußtet Ihr zum Beispiel, dass eines der zwei Augen einer Flunder erst nach der Geburt von einer Seite auf die andere wandert, oder dass einige Fische ihr Geschlecht im Laufe ihres Lebens wechseln (meist weiblich zu männlich)? Ganz krasse Farben und Formen bietet die Makrowelt der Nudibranches und Würmer. Wir könnten uns ewig damit beschäftigen... Deshalb hier eine Auswahl von Bildern und Videos mit, wann immer möglich oder sinnvoll, Untertiteln. Die Tiernamen bleiben alle auf Englisch, weil wir sie so kennen und mögen. 😃


Spesso, dopo il lavoro sott'acqua, c'è ancora abbastanza tempo e aria per esplorare il mondo marino che ci circonda. Inoltre, ci sono sempre "fun dives" sparse durante la settimana, cioè occasioni in cui ci immergiamo "normalmente" e ci godiamo un sito, facendo un viaggio di scoperta. La maggior parte delle volte siamo lì sotto con le nostre GoPro, a scattare foto e a fare video. Anche se non possiamo catturare l'atmosfera, i colori e le impressioni così come li viviamo, le registrazioni ci offrono una sorta di supporto alla memoria e a voi - forse - una piccola visione di questo mondo (rispetto ad altre zone della terra) ancora poco esplorato.

Inoltre, dopo ogni immersione abbiamo un pesce o un altro animale marino di cui vogliamo scoprire il nome cercandolo in uno dei libri di riferimento: è una parte importante del divertimento e rende le immersioni interessanti. Nel frattempo, siamo diventati abbastanza bravi ad assegnare i pesci a determinate famiglie e siamo sempre affascinati da quanto sia vario, curioso e sorprendente il mondo di tutti gli animali marini. Sapevate, ad esempio, che uno dei due occhi di una sogliola si sposta da un lato all'altro solo dopo la nascita, o che alcuni pesci cambiano sesso nel corso della loro vita (per lo più da femmina a maschio)? Il mondo macro dei nudibranchi e dei vermi offre colori e forme molto particolari. Potremmo continuare all'infinito... Ecco quindi una selezione di immagini e video con sottotitoli quando possibile o utile. I nomi degli animali rimangono tutti in inglese, perché così li conosciamo e così ci piacciono. 😃


Often, after our work underwater, there is still enough time and air to explore the marine world around us. In addition, there are always "fun dives" scattered throughout the week, i.e. dives where we just go diving "normally" and enjoy a dive site, going on a voyage of discovery. Most of the time we are out there with our GoPros, taking photos and videos. Although we can't really capture the atmosphere, colours and impressions as we experience them, the recordings offer us a kind of memory support and you - perhaps - a small insight into this (compared to other areas of the earth) still less explored world.

Also, after each dive we have a fish or other marine animal whose name we want to find out by looking it up in one of the reference books - that's a big part of the fun and makes the diving interesting. In the meantime, we have become quite good at assigning fish to certain families and are always fascinated by how diverse, curious and amazing the world of all marine animals is. Did you know, for example, that one of the two eyes of a flounder moves from one side to the other only after birth, or that some fish change their sex in the course of their life (mostly female to male)? The macro world of nudibranchs and worms offers some very stark colours and shapes. We could go on forever with this... So here is a selection of pictures and videos with subtitles whenever possible or useful. The animal names all remain in English, because that's how we know and like them. 😃


Peppermint shrimps

Giant moray eel 


Christmas tree worms

Map Pufferfish 

Horseshoe crab

Blue-spotted stingray 


Peppermint shrimps

Coral with sponge on top

Nudibranch

Green turtle (male)

Long fin spadefish


Blackspotted Pufferfish

Chocolate chip sea star

Sponge

Butterfly fish

Indian lionfish

Turtle with 2 remoras

Indian lionfish by night

Blue velvet headshield slug


Night dive: a hermit crab


Night dive: Anemone hermit crab

Broadclub cuttlefish


Squid


Catfish (juveniles)


Friday, 20 October 2023

Pom Pom - Bauarbeiten unter Wasser // Cantiere sott'acqua // Building place under water

Ihr erinnert Euch an "unsere" künstlichen Korallenriffe aus Zement und Arakflaschen? Diese standen bisher ja bei uns im Camp zum trocknen; von Zeit zu Zeit jedoch, werden zehn Stück davon auf das Boot verladen, um sie zu einem neuen Korallenriffprojekt zu bringen. Dieses befindet sich im Norden von Pom Pom, am Tauchplatz "North Tip" und besteht aus Reihen von jeweils zehn Flaschenelementen. Zwei Reihen und damit 20 von den geplanten 100 Flaschenelementen stehen schon; wir haben die Aufgabe eine weitere Reihe hinzuzufügen. Dazu sind wir insgesamt zu fünft unter Wasser, eine Schnorchlerin auf dem Wasser und zwei an Bord des Boots (plus Captain).

Und so läuft der Arbeitsprozess ab: Die beiden auf dem Boot lassen ein Flaschenelement per Seil ins Wasser, die Schnorchlerin koordiniert/kommuniziert zwischen Bootscrew und dem Taucher, der das Flaschenelement am Meeresgrund in circa 3 bis 4 Meter Tiefe in Empfang nimmt. Sobald dieser das Seil gelöst hat kommen die beiden Taucher-Buddy-Teams - eines davon sind wir! - zum Einsatz. Wir legen ein Seil mit einer sogenannten "lift bag" um den Zementblock, zurren es fest und lassen mit unserem zweiten Atemgerät vorsichtig Luft in den Sack strömen, bis sich das Flaschenelement leicht vom Boden hebt (s. Video 1 vom anderen Buddy-Team). Jetzt beginnt der Transport zu zweit über geschätzt 30 bis 50 Meter hin zum neuen künstlichen Riff. Dort müssen wir die Luft per Ventil aus dem Sack lassen und den Block akkurat auf den Meeresboden und in die neue Reihe setzten. Gar nicht so einfach, wenn das Ventilloch recht klein ist für unsere Finger, die in Neoprenhandschuhen stecken. Der Transportprozess ist eine ziemlich komplexe und herausfordernde Aufgabe für uns Neulinge, die Absprache und v.a. eine starke Koordination unter Wasser erfordert. Zusätzlich hatten wir eine mittelstarke Strömung, die das ganze nicht einfacher machte! Nachdem das zehnte Element erfolgreich gesetzt ist, ist Teil 1 der Aufgabe abgeschlossen.


Ricordate i "nostri" elementi di reef artificiali fatti di cemento e bottiglie di arak? Finora erano rimasti ad asciugare nel nostro campo; di tanto in tanto, però, dieci vengono caricati sulla barca per essere portati dove verrà costruito un nuovo pezzo di barriera corallina. Questo posto si trova a nord di Pom Pom, nel sito chiamato "North Tip" e consiste di file di dieci elementi ciascuna. Due file e quindi 20 dei 100 elementi previsti sono già in posizione; a noi spetta il compito di aggiungere un'altra fila. Siamo in cinque sott'acqua, una snorkelista in acqua e due a bordo della barca (più il capitano).

Ecco come si svolge il processo: i due sulla barca calano in acqua un elemento con una corda, lo snorkeler coordina/comunica tra l'equipaggio della barca e il sub che riceve l'elemento e lo piazza in un punto senza coralli del fondale a circa 3 o 4 metri di profondità. Non appena il sub rilascia la corda, entrano in azione le due squadre sott'acqua, una delle quali è la nostra! Mettiamo una corda con una "lift-bag" intorno al blocco di cemento, lo leghiamo bene e facciamo entrare con cautela dell'aria nella sacca con il nostro secondo erogatore finché l'elemento non si solleva leggermente dal fondo (vedi il video 1 dell'altro buddy team). Ora comincia il trasporto per circa 30-50 metri fino alla nuova barriera corallina artificiale. Lì dobbiamo far uscire l'aria dalla sacca tramite una valvola e posizionare il blocco con precisione sul fondale e nella nuova fila. Non è così facile, dato che il foro della valvola è piuttosto piccolo per le nostre dita, soprattutto visto che indossiamo guanti di neoprene. Il processo di trasporto è un compito piuttosto complesso e impegnativo per noi neofiti, che richiede scambi e soprattutto una forte coordinazione sott'acqua. Inoltre, c'è una corrente mediamente forte, che non rende le cose più facili! Dopo che il decimo elemento è stato posizionato con successo, la prima parte del compito è completata.


Do you remember "our" artificial coral reefs made of cement and arak bottles? Until now, these were left to dry in our camp; from time to time, however, ten of them are loaded onto the boat to be taken to a new reef project. This is located in the north of Pom Pom, at the dive site "North Tip" and consists of rows of ten bottle elements each. Two rows and thus 20 of the planned 100 bottle elements are already in place; we have the task of adding another row. There are five of us underwater, one snorkeller on the water and two on board the boat (plus the captain).

And this is how the work process goes: The two on the boat let a bottle element into the water by rope, the snorkeller coordinates/communicates between the boat crew and the diver, who receives the bottle element on the seabed at a depth of about 3 to 4 metres. As soon as the diver has released the rope, the two diver buddy teams - one of which is us! - come into action. We put a rope with a so-called "lift bag" around the cement block, lash it tight and carefully let air flow into the bag with our second breathing device until the bottle element lifts slightly from the bottom (see video 1 of the other buddy team). Now the two of us start the transport over an estimated 30 to 50 metres to the new artificial reef. There we have to let the air out of the bag via a valve and place the block accurately on the seabed and in the new row. Not so easy when the valve hole is quite small for our fingers in neoprene gloves. The transport process is quite a complex and challenging task for us newcomers, requiring communication and especially strong coordination under water. In addition, we have a medium strong current, which doesn't make it any easier! After the tenth element is successfully set, part 1 of the task is completed.


Video 1

In Teil 2 geht es darum, die Flaschenelemente fest zu verankern. Dafür müssen jeweils ein Stahlstab rechts und links in ein Loch im Block eingehämmert werden. Nach Teil eins ist das ein Klacks für uns (s. Video 2). 😉💪🤗 Wir halten uns ran und haben bald zügig alle unsere fünf Blöcke durch (die anderen fünf werden von zweiten Buddy-Team eingehauen), auch, weil wir so langsam an die vereinbarte, minimale Barzahl unserer Luft kommen. Das Ganze ist nämlich auch körperlich nicht ohne! Am Ende sind wir mächtig stolz auf uns und auch etwas geschafft - v.a. Anne, die beim Transport stellenweise echt gekämpft hat gegen die Strömung und andere Schwierigkeiten (z. B. beschlagene Taucherbrille).


La seconda parte consiste nell'ancorare saldamente gli elementi al fondale. A tal fine, è necessario inserire un'asta d'acciaio in fori ai due lati del blocco e piantarla nel fondo a martellate. Dopo la prima parte, per noi è un gioco da ragazzi (vedi video 2) 😉💪🤗 Continuiamo a lavorare e presto riusciamo a fissare tutti e cinque i blocchi (gli altri cinque vengono martellati dal secondo buddy team), anche perché stiamo lentamente raggiungendo il minimo di aria nella bombola per rimanere in sicurezza. Il tutto è anche fisicamente impegnativo! Alla fine, siamo molto orgogliosi di noi stessi e un po' esausti - soprattutto Anne, che ha davvero lottato contro la corrente e altre difficoltà durante il trasporto (es. la maschera appannata).


Part 2 is about anchoring the bottle elements firmly. To do this, a piece of rebar must be hammered into a hole in the block on the right and left. After part one, this is a piece of cake for us (see video 2) 😉💪🤗 We keep at it and soon have all five blocks fixed (the other five are hammered in by the second buddy team), also because we are slowly reaching the minimum volume of air in our tanks to stay safe. This whole business is also physically demanding! In the end, we are very proud of ourselves and a bit exhausted - especially Anne, who really struggled against the current and other difficulties during the transport (e.g. mask fogging up).


Video 2


Tuesday, 17 October 2023

Pom Pom - Von Fischen und Korallen // Di pesci e coralli // Of fish and corals

Wegen der Schildkröten haben wir uns ursprünglich gar nicht bei tracc angemeldet; das kam erst später als Aspekt hinzu. Uns interessierte in erster Linie viel tauchen zu können und dabei unser Wissen rund um die Unterwasserwelt und v.a. Fische zu erweitern. Da war dann der Schritt hin auch zu Korallen und Riffen insgesamt klar. Und viele der Aktivitäten und Projekte drehen sich genau darum. Da wir hier viel lernen müssen und wir meist alle Hände voll zu tun haben, gibt es dieses Mal wenig Fotos und viel Text. Auf geht's! 


Inizialmente non ci siamo iscritti alla tracc per le tartarughe, che sono diventate un aspetto importante solo in seguito. Ci interessava soprattutto poter fare molte immersioni e ampliare la nostra conoscenza del mondo sottomarino e in particolare dei pesci. Poi il passo verso i coralli e le barriere coralline in generale è stato chiaro. E molte delle attività e dei progetti ruotano proprio intorno a questo. Poiché qui dobbiamo imparare molto e di solito abbiamo le mani occupate, questa volta ci sono poche foto e molto testo. Andiamo!


Originally, we didn't sign up for tracc because of the turtles; that only became an aspect later. We were primarily interested in being able to dive a lot and to expand our knowledge of the underwater world and especially fish. Then the step towards corals and reefs in general was clear. And many of the activities and projects revolve around exactly that. Since we have to learn a lot here and usually have a lot to do and focus on, there are few photos and much text this time. Let's get started!


1.) Fische identifizieren - im Wasser und außerhalb // Identificare pesci in acqua e fuori // Identifying fish in the water and outside of it

Seit wir tauchen haben wir unsere Lieblingsfische (Anne: red-tooth triggerfish; Stef: Moorish Idol), haben uns die Namen vieler weiterer über die Jahre hinweg angeeignet - und das oft in zwei Versionen: auf Englisch, denn das ist die Sprache der Taucher-Community, und als Handzeichen unter Wasser. Im Fish-Identification-Workshop an Land wird zuerst theoretisch vermittelt, wie Fische grob klassifiziert werden und wie wir in einem der Fachbücher exakt den Fisch finden und mit einem Namen versehen können, den wir unter Wasser gesehen haben. Schießlich lernen wir konkret Namen und Handzeichen von rund 20 Fischen - einige davon kennen wir schon, was das ganze für uns einfacher macht.

Der nächste Schritt ist dann natürlich die praktische Übung am "Objekt". Also, Tauchzeug angelegt und ab ins Meer. Zehn Minuten lang pro Person zeigt unser Tauchguide per Finger auf diverse Fische mit der implizierten Frage: "Welcher Fisch ist das?" und einer von uns muss jeweils per Handzeichen antworten. Oft liegen wir richtig, manchmal daneben - wir schlagen uns ziemlich gut und haben viel Spaß! 

Weiter geht es mit der sogenannten Roving Diver Technique, die für Wissenschaftler verwertbare Daten zum Fischbestand, der Diversität etc. liefert. Stef ist mit einer Kamera ausgestattet, Anne mit einer Tafel und einem Bleistift. 40 Minuten lang (jeweils 10 Minuten auf 25m, 15m, 5m und 3m) macht Stef von fast jedem Fisch, der ihm vor die Linse kommt ein Konterfei, über das man ihn dann an Land wird identifizieren können. Sobald ein gutes Bild gelungen ist, notiert Anne auf der Tafel die exakte Tiefe, die Art der Umgebung (Ebene, Hang, Wand), das Verhalten des Fischs und wie viele andere Exemplare dieses spezifischen Fisches noch in einem Radius von drei Metern zu sehen sind. Zurück im Camp haben wir 30 Fische "gesammelt", die es nun genau zu identifizieren und per Laptop in eine Datenbank einzupflegen gilt. Das braucht etwas Zeit, weckt aber unseren Ehrgeiz!


Da quando ci immergiamo, abbiamo i nostri pesci preferiti (Anne: red-tooth triggerfish; Ste: Moorish Idol), abbiamo imparato i nomi di molti altri nel corso degli anni - e spesso in due versioni: in inglese, perché è la lingua della comunità subacquea, e come segni sott'acqua. Nel workshop di identificazione dei pesci sulla terraferma, impariamo prima di tutto come vengono classificati approssimativamente i pesci e come possiamo trovare e identificare esattamente i pesci che abbiamo visto sott'acqua in uno dei libri di riferimento. Infine, impariamo i nomi e i segnali di circa 20 pesci, alcuni dei quali li conosciamo già, il che ci facilita il compito.

Il passo successivo è naturalmente l'esercizio pratico sull'"oggetto". Quindi, si indossa l'attrezzatura e si scende in mare. Per dieci minuti a testa, la nostra guida indica con il dito vari pesci con la domanda implicita: "Che pesce è questo?" e uno di noi deve rispondere ogni volta con il segno corretto. Spesso abbiamo ragione, a volte ci sbagliamo: tutto sommato ce la caviamo abbastanza bene e ci divertiamo molto!

Continuiamo con la cosiddetta tecnica del Roving Diver, che fornisce agli scienziati dati utilizzabili sulla popolazione ittica, sulla diversità, ecc. Ste ha una macchina fotografica, Anne una lavagnetta e una matita. Per 40 minuti (10 minuti ciascuno a 25m, 15m, 5m e 3m) Ste scatta una foto di molti dei pesci che passano davanti al suo obiettivo, che può poi essere utilizzata per identificarli a terra. Una volta scattata una buona foto, Anne annota sulla lavagnetta la profondità esatta, il tipo di ambiente (piano, pendio, parete), il comportamento del pesce e quanti altri esemplari di quello specifico pesce sono visibili nel raggio di tre metri. Tornati al campo, abbiamo "raccolto" 30 pesci, che ora devono essere identificati con precisione e inseriti in un database tramite un computer portatile. Questo richiede un po' di tempo, ma ci rende anche ambiziosi.


Since we've been diving, we've had our favourite fish (Anne: red-tooth triggerfish; Stef: Moorish Idol), acquired the names of many more over the years - and often in two versions: in English, because that's the language of the diving community, and as hand signs under water. In the fish identification workshop on land, we first learn theoretically how fish are roughly classified and how we can find and name exactly the fish we have seen under water in one of the reference books. Finally, we learn the names and hand signals of around 20 fish - some of which we already know, which makes the whole thing easier for us.

The next step is of course the practical exercise on the "object". So, diving gear on and off into the sea. For ten minutes per person, our dive guide points at various fish with her finger, implying the question: "Which fish is this?" and one of us has to answer each time with a hand signal. Often we are right, sometimes wrong - we do pretty well and have loads of fun!

We continue with the so-called Roving Diver Technique, which provides scientists with usable data on the fish population, diversity, etc. Stef is equipped with a camera, Anne with a board and pencil. For 40 minutes (10 minutes each at 25m, 15m, 5m and 3m) Stef takes a pic of almost every fish that comes in front of his lens, which will then be used to identify it on land. Once a good picture has been taken, Anne notes on the board the exact depth, the type of environment (flat, slope, wall), the behaviour of the fish and how many other specimen of that fish are visible within a radius of three metres. Back at camp, we have "collected" 30 fish, which now need to be precisely identified and entered into a database via a laptop. This takes a little time, but feeds our ambition.


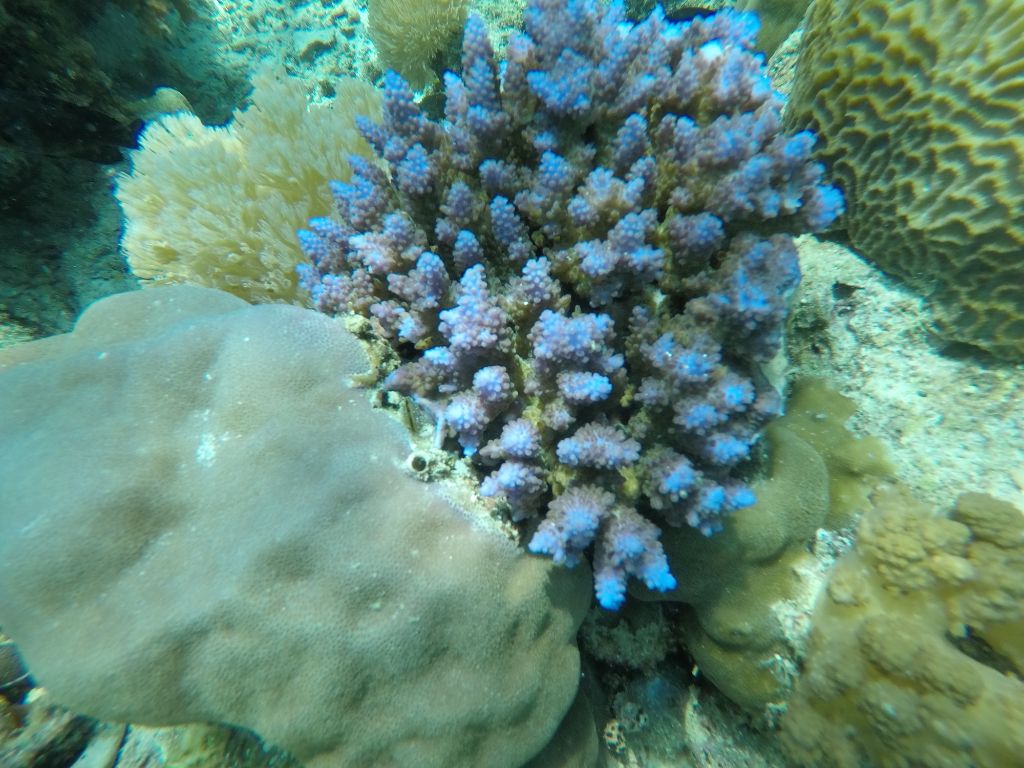
2.) Korallen identifizieren // Identificare coralli // Identifying corals

Unterschiedliche Korallen gibt es mindestens so viele wie Fische, wenn nicht gar mehr. Definitiv kennen wir hier kaum Namen und es gibt (soviel wir wissen) auch keine Handzeichen unter Wasser für sie. Wir lernen wieder zuerst in einer Theoriestunde, wie Korallen grundsätzlich aufgebaut sind, wie sie funktionieren, wie Korallenbleiche zustande kommt und ein paar Fachbegriffe. Auch hier hilft natürlich wieder Fachliteratur mit einer Anleitung zur Identifikation. Da dies aber noch einmal viel komplizierter ist, als bei Fischen, lernen wir nur einen grundsätzlichen Herangang, wie man auf die Korallenfamilie kommt und dann die "Genus-Gruppe" festlegt. Dafür brauchen wir praktisches Material. Also wieder rein ins Tauchzeug und unter Wasser Fotos schießen; jeweils drei von einer Koralle: Foto Nummer eins soll die Koralle komplett in ihrer Umgebung zeigen; Nummer zwei eine Nahaufnahme nur der spezifischen Koralle und Nummer drei eine mikrokskopisch nah aufgenommener Ausschnitt, der die Struktur der Polypen zeigt. Bei letzterem müssen wir bis auf einen oder zwei Zentimeter mit der Linse nah heran ohne die Koralle zu berühren. Da braucht es eine gute Kontrolle über die "Buoyancy", also den Auftrieb bzw. das ruhige Schweben im Wasser.


Esistono almeno tanti coralli diversi quanti sono i pesci, se non di più. Sicuramente, non conosciamo quasi nessun nome e non ci sono (per quanto ne sappiamo) segni sott'acqua per loro. Anche in questo caso, in una lezione teorica impariamo come sono fatti i coralli, come funzionano, come avviene lo sbiancamento dei coralli e alcuni termini tecnici. Anche in questo caso, naturalmente, la letteratura tecnica ci aiuta con le istruzioni su come identificarli. Ma poiché è molto più complicato che con i pesci, impariamo solo un approccio di base, come trovare la famiglia dei coralli e poi determinare il genere a cui appartengono. Per questo abbiamo bisogno di materiale pratico. Torniamo quindi sott'acqua e scattiamo delle foto, tre per ogni corallo: la foto numero uno deve mostrare il corallo completo nel suo ambiente, la numero due un primo piano solo del corallo specifico e la numero tre una sezione microcoscopica ravvicinata che mostri la struttura dei polipi. Per quest'ultima, dobbiamo avvicinarci a un centimetro o due con l'obiettivo senza toccare il corallo. Ciò richiede un buon controllo dell'assetto per mantenere la posizione corretta.


There are at least as many different corals as there are fish, if not more. Definitely, we hardly know any names here and there are (as far as we know) no hand signals under water for them. Again, we first learn in a theory lesson how corals are basically built, how they function, how coral bleaching occurs and a few technical terms. Again, of course, technical literature helps with instructions on how to identify them. But since this is much more complicated than with fish, we only learn a basic approach, how to find the coral family and then determine the "genus group". For that we need practical material. So we get back into our diving gear and take photos under water; three of each coral: photo number one needs to show the coral completely in its environment; number two a close-up of only the specific coral and number three a microcoscopically close-up section showing the structure of the polyps. For the latter, we have to get within a centimetre or two with the lens without touching the coral. This requires good buoyancy, i.e. floating calmly in the water.


3.) Korallen pflanzen // Piantare coralli // Planting corals

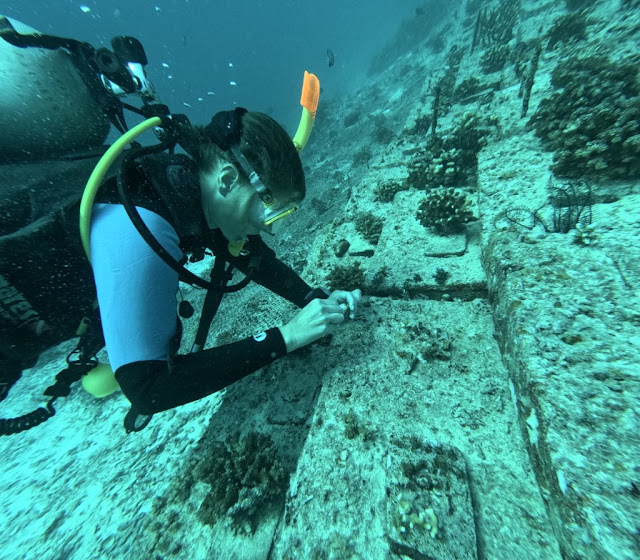
Die Dynamitfischerei der Vergangenheit und auch der Gegenwart hat viele Korallenriffe teilweise oder gar komplett zerstört. Der Aufbau neuer, künstlicher Riffe, die mit der Zeit wieder von Hartkorallen besiedelt werden, ist die Hauptaufgabe von tracc. Dazu gehört u.a. das "Pflanzen" von Korallen. Was braucht man dazu? Eine Plastiktüte, einen Schneider, eine Zahnbürste und eine Tube Kleber. Wir tauchen zu einem Netz an dem Korallen spezifisch für den Zweck der Verfielfältigung gezogen werden. Jeder von uns schneidet mit dem Schneider zehn mindestens Fingerkuppen-große Stücke ab und steckt sie in die Plastiktüte, die der Tauchpartner aufhält. Am künstlichen Riff angekommen, bekommen wir jeweils einen "Pflanzplatz" für unsere Korallenstückchen zugewiesen. Dieser muss jetzt per Zahnbürste sauber geschrubbt werden. Danach kommt die Klebetube zum Einsatz. Jede Schneidefläche wird mit einer guten Portion Kleber versehen und muss dann mindestens 30 Sekunden lang auf den Untergrund aufgedrückt werden, damit der Kleber hält - möglichst ohne Wackeln. 

Wir sind mit den Augen ganz nah am Riff und an anderen, noch kleinen Korallen, die schon schön am Wachsen sind. Während unserer Arbeit besuchen uns Fische und wir sehen kleinste, fast transparente Krebse. Ein cooler Job, der aufgrund der hohen Konzentration den Kopf frei macht!


La pesca con la dinamite, in passato e anche ora, ha distrutto parzialmente o addirittura completamente molte barriere coralline. La costruzione di nuove barriere artificiali, che nel tempo saranno ripopolate da coralli duri, è il compito principale del tracc. Questo comprende, tra l'altro, "piantare" coralli. Cosa serve? Un sacchetto di plastica, un tronchesino, uno spazzolino da denti e un tubetto di colla. Ci immergiamo dove c'è una rete su cui ci sono coralli non fissati al substrato che vengono utilizzati appositamente per la riproduzione. Ognuno di noi usa il tronchesino per tagliare dieci pezzi grandi almeno quanto un polpastrello e li mette nel sacchetto di plastica tenuto dal compagno di immersione. Una volta arrivati alla barriera corallina artificiale, a ciascuno di noi viene assegnato un "punto di impianto" per i nostri pezzi di corallo. A questo punto si deve pulire con lo spazzolino da denti. Poi si usa il tubetto di colla. Ogni superficie tagliata riceve una buona porzione di colla e deve essere premuta sulla superficie per almeno 30 secondi in modo che la colla aderisca, preferibilmente senza muoversi.

Siamo molto vicini alla barriera e ad altri coralli ancora piccoli che stanno già crescendo bene. Durante il nostro lavoro, i pesci ci fanno visita e vediamo dei granchi piccolissimi, quasi trasparenti. Un bel lavoro che, in qualche modo, "libera" la mente a causa dell'alta concentrazione!


Dynamite fishing in the past and also in the present has partially or even completely destroyed many coral reefs. The construction of new, artificial reefs, which will be repopulated by hard corals over time, is the main task of tracc. This includes, among other things, the "planting" of corals. What do you need? A plastic bag, a cutter, a toothbrush and a tube of glue. We dive to a net on which corals are grown specifically for the purpose of reproduction. Each of us uses the cutter to cut off ten pieces of at least the size of a fingertip and puts them into the plastic bag held by the diving partner. Once we arrive at the artificial reef, we are assigned a "planting spot" each for our coral pieces. This has to be scrubbed clean before with a toothbrush. Then the glue tube is used. Each cutting surface is given a good portion of glue and then has to be pressed onto the surface for at least 30 seconds so that the glue sticks - preferably without wobbling.

Our eyes are very close to the reef and to other, still small corals that are already growing nicely. During our work, fish visit us and we see super small, almost transparent crabs. A cool job that clears the head - we need quite some concentration!

Anne beim Korallenstücke abschneiden // Anne che raccogli pezzi di corallo // Anne fraggs corals


Anne beim Korallenstücke abschneiden // Anne che raccogli pezzi di corallo // Anne fraggs corals


Stef beim Korallen pflanzen // Ste che pianta coralli // Stef plants corals 


Anne beim Korallen pflanzen // Anne che pianta coralli // Anne plants corals 

4.) Künstliche Korallenriffe pflegen // Curare barriere coralline artifciali // Maintaining artificial coral reefs

Zwei Tage nachdem wir die Korallen gepflanzt haben, schweben wir wieder am selben Riff und vor unseren kleinen Stückchen. Dieses Mal geht es jedoch um die Pflege des gesamten künstlichen Riffs. Während eine Taucherin tote Korallenstücke aussortiert, schrubbt ein zweiter Taucher hier und da Sediment und Algen weg. Stef und Anne sind für das Aufsammeln noch lebender Korallenstücke eingeteilt, die in einer Spalte oder im Netz verankert werden sollen, damit sie wieder anwachsen können oder beim nächsten Mal neu angeklebt werden.

Als Anne eine der etwas größeren, lebenden Korallen anfasst, um sie im Netz zu verhaken, brennen auf einmal drei Finger leicht und so entpuppt sich das Teil als Feuerkoralle. Mist - aber zum Glück ist es nicht weiter schlimm, weil nicht zu lange und zu fest angefasst und etwas Essig an Land löst das Thema. Jetzt ist auf jeden Fall ganz klar, wie eine Feuerkoralle aussieht 😑


Due giorni dopo aver piantato i coralli, siamo di nuovo in giro per la stessa barriera corallina e davanti ai nostri piccoli pezzi di corallo. Questa volta, però, si tratta di manutenere l'intera barriera artificiale. Mentre un sub elimina i pezzi di corallo morti, un altro pulisce i sedimenti e le alghe qua e là. Ste e Anne sono incaricati di raccogliere i pezzi di corallo ancora vivi, per ancorarli in una fessura o nella rete in modo che possano ricrescere o essere riattaccati la volta successiva.

Quando Anne tocca uno dei coralli vivi un po' più grandi per agganciarlo alla rete, improvvisamente tre dita si bruciano leggermente e il pezzo si rivela essere corallo di fuoco. Merda - ma per fortuna non è troppo grave, perché non l'ha toccato troppo a lungo e troppo forte e un po' di aceto sulla terraferma ha risolto il problema. Ora è chiaro che aspetto abbia un corallo di fuoco 😑


Two days after we planted the corals, we are again hovering on the same reef and in front of our little pieces. This time, however, it's about maintaining the entire artificial reef. While one diver removes dead coral pieces, a second diver scrubs away sediment and algae. Stef and Anne are assigned to pick up pieces of coral that are still alive, to anchor them in a crevice or in the net so that they can grow back or be reattached the next time.

When Anne touches one of the slightly larger, living corals to hook it back into the net, three fingers suddenly burn slightly - the piece turns out to be fire coral. Not ideal - but fortunately it's not too bad, because she didn't touch it for too long and too hard and some vinegar on land solves the issue. Now it is clear what a fire coral looks like 😑


5.) Elemente für künstliche Korallenriffe bauen // Preparare elementi per barriere coralline artificiali // Building elements for artificial reefs

Um ein künstliches Riff zu bauen, braucht man einzelne Elemente. Diese bauen wir aus Zement und leeren Arak-Flaschen, die schon mit Zement überzogen wurden. Am glatten Glas würde sich keine Koralle ansiedeln, weil sie sich nirgends festhalten kann; am rauen Zement schon. Während zwei von unserer Gruppe den Zement anmischen, der mit Sand vom Strand (hat Stef zusammen mi einem anderen geholt), ölt Anne die Plastikwannen ein. In eine erste Lage Zement werden sechs Flaschen und zwei Rohre (seitlich, um nachher Löcher für den Transport und die Fixierung am Boden zu haben) in die Wanne eingesetzt und weiter mit Zement aufgefüllt. Besprenkelt mit Korallenstückchen ist alles fertig zum Trocknen. Irgendwann in den kommenden Wochen werden wir wohl dabei sein und lernen, wie diese schweren Brocken im Meer positioniert werden. Wir sind gespannt!


Per costruire una barriera corallina artificiale sono necessari singoli elementi. Noi li costruiamo con cemento e bottiglie di arak vuote già ricoperte di cemento. Nessun corallo si depositerebbe sul vetro liscio perché non ha dove aggrapparsi, mentre lo può fare sul cemento ruvido. Mentre due del nostro gruppo mescolano il cemento, che è fatto con la sabbia della spiaggia (Ste l'ha recuperata insieme ad un altro), Anne lubrifica le vaschette di plastica. In un primo strato di cemento, sei bottiglie e due tubi (sul lato, per avere dei fori per il trasporto e il fissaggio a terra) vengono messi nella vasca e riempiti ulteriormente di cemento. Cosparso di pezzetti di corallo, tutto è pronto per l'asciugatura. Nelle prossime settimane probabilmente probabilmente impareremo come questi pesanti elementi vengono posizionati nel mare. Non vediamo l'ora!


To build an artificial reef, you need individual elements. We build these from cement and empty arak bottles that have already been covered with cement. No coral would settle on the smooth glass because it has nowhere to cling to; it does on the rough cement though. While two of our group mix the cement, which is made with sand from the beach (Stef fetches it together with someone else), Anne oils the plastic tubs. In a first layer of cement, six bottles and two pipes (on the side, to have holes for transport and fixing on the ground later) are put into the tub and filled up further with cement. Sprinkled with pieces of coral, everything is ready to dry. Sometime in the coming weeks we will probably be there to learn how these heavy chunks are positioned in the sea. We are excited!


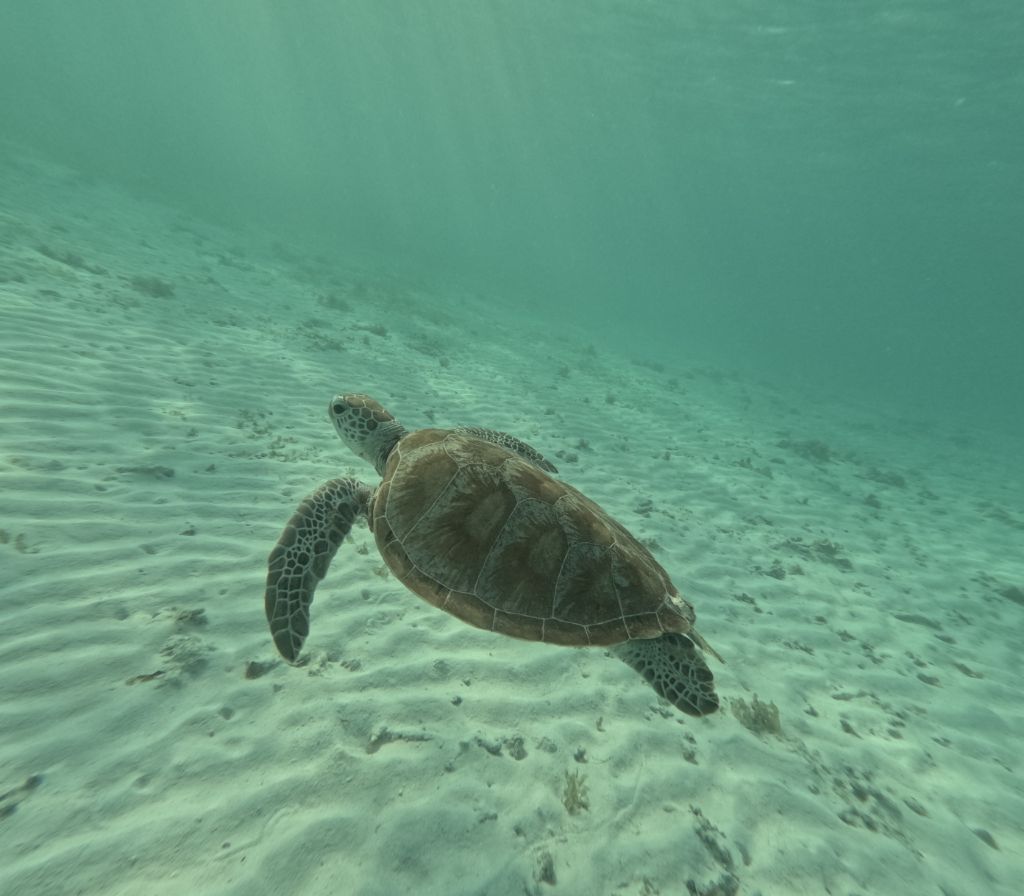
Hier ein paar Fotos unserer Aufgaben-freien Tauchgänge:

Ecco qualche foto dalle nostre immersioni senza mansioni:

Here a few pics from our task-free dives:


Monday, 16 October 2023

Pom Pom - Schildkröten-verliebt // Innamorati delle tartarughe // In love with turtles

Fast eine Woche ohne einen Blogpost (zwischen Taiwan und unserer Ankunft in Borneo)?! Was ist denn da los? Wir sind Euch eine Erklärung schuldig - es wird eine gute sein, versprochen. Die Arbeit als Freiwillige bei tracc auf Pom Pom Island bedeutet, dass wir jeden Tag in Forschungsprojekte und Aktivitäten zum Schutz der Meere eingebunden sind. Da unsere erste Woche hiermit ziemlich voll war, haben wir beschlossen, zwei Beiträge zu schreiben. Bleibt also dran!

Einer der Hauptbereiche der Aktivitäten, die tracc hier auf Pom Pom durchführt, hat mit Schildkröten zu tun und findet sowohl an Land als auch unter Wasser statt.

1.) Identifizierung und Kontrolle der Schildkröten

Um die Schildkröten in der Umgebung von Pom Pom und auf den nahe gelegenen Inseln zu erfassen, baut tracc seit einigen Jahren eine Datenbank auf, mit Daten, die von Mitarbeitern und Freiwilligen gesammelt und dann mit Hilfe einer Software analysiert werden.

Die "Flecken" - in der Fachsprache "Scutes" genannt - auf den Wangen einer Schildkröte sind je Individuum so einzigartig, wie ein Fingerabdruck bei Menschen. Deshalb werden bei den "Turtle Facial ID"-Tauchgängen von allen Schildkröten, die wir finden, Fotos gemacht, am Besten von beiden Wangen und dann noch ein Bild von oben, das das gesamte Tier zeigt, mit Panzer, Kopf, Schwanz und Flossen.

Nach einer Theoriestunde, in der wir lernen, was genau zu tun ist, ziehen wir unsere Tauchausrüstung an und steigen in das Boot, um in ein paar Minuten zum für heute ausgewählten Tauchplatz zu fahren. Stef trägt die Kamera, während Anne eine Plastiktafel dabei hat, auf der sie Metadaten zu jeder Schildkröte aufzeichnet: die Art (Green oder Hawksbill, die beiden häufigsten Arten hier), die Tiefe, die geschätzte Größe (S, M, L), das Geschlecht (Männchen haben einen langen Schwanz, manchmal länger als die Rückflossen) und das Verhalten, d. h. was sie tun, wenn wir sie sehen (ruhen, schwimmen, fressen...). Die Hauptschwierigkeit besteht darin, Fotos zu machen, die von der Software analysiert werden können: sie müssen auf Höhe des Kopfs der Schildkröte, seitlich aufgenommen und ziemlich nah dran sein, so dass der Kopf selbst den größten Teil des Fotos einnimmt (Zoomen ist nicht erlaubt, da dies zu Qualitätsverlusten und Verpixelung führt). Und warum ist das so schwierig? Weil die Schildkröten ja leben und meistens wegschwimmen, wenn Stef sich ihnen mit der Kamera nähert. ;-) Wir brauchen mehr Übung, um die Technik zu perfektionieren. Es ist in jedem Fall ein echt cooler Tauchgang, wenn man davon absieht, dass die meisten Schildkröten erst am Ende des Tauchgangs "auftauchen", nachdem wir die Datenerfassung bereits offiziell eingestellt hatten (da es sich um wissenschaftliche Untersuchungen handelt, müssen bestimmte Vorgaben eingehalten werden).  

Ein paar Tage später machen wir einen sogenannten "Turtle Epibionts"-Tauchgang. Epibionten sind Organismen, die in Symbiose mit den Schildkröten leben und sich positiv oder auch negativ auf deren Gesundheit auswirken können. Unsere Aufgabe ähnelt in gewisser Weise dem vorigen Tauchgang zur Identifizierung der Wangenmusterung, jedoch mit der zusätzlichen Aufgabe, jetzt auch Fotos des Schildkrötenpanzers von verschiedenen Seiten zu machen, um eventuelle Schiffshalterfische (remoras) - Putzerfische, die sich an andere Meerestiere anheften (typischerweise an Haie), Algen, Seepocken und Wulste, Wunden oder Absplitterungen beispielsweise auf dem Panzer zu erkennen. Auch diese Aktivität macht Spaß und ist sehr interessant, vor allem auch, weil wir viel mehr Schildkröten als beim ersten Mal sichten: 17 nehmen wir auf - wenn auch aufgrund der Fotoqualität nicht alle verwertbar sind (auch hier gibt es noch Raum für Verbesserungen) und 27 Sichtungen insgesamt. 🤩 🐢

Nach jedem Schildkrötentauchgang erfolgt eine gründliche Dateneingabe am Laptop, um alle Funde und Informationen, die während des Tauchgangs gesammelt wurden, zur weiteren Prüfung durch die Wissenschaftler festzuhalten.


Quasi una settimana senza blogpost (tra Taiwan e il nostro arrivo in Borneo)?! Cosa sta succedendo? Ci vuole una spiegazione - e sarà una spiegazione valida, promesso. Fare i volontari per tracc a Pom Pom Island significa essere coinvolti ogni giorno in progetti di ricerca e in attività di conservazione marina. Visto che la nostra prima settimana qui è stata piuttosto intensa, abbiamo deciso di dividerla in due post. Quindi restate sintonizzati.

Una delle principali attività svolte dal tracc qui a Pom Pom ha a che fare con le tartarughe e si svolge sia a terra che sott'acqua.

1.) Identificazione e monitoraggio delle tartarughe

Per tenere traccia delle tartarughe che vivono intorno a Pom Pom e nelle isole vicine, tracc sta costruendo un database utilizzando i dati raccolti dai membri dello staff e dai volontari e poi analizzati con l'aiuto di un software.

È stato scoperto che le "macchie" - tecnicamente chiamate "scuti" - sulle guance di una tartaruga sono univoche per l'individuo specifico, come le impronte digitali per gli esseri umani. Per questo motivo, nelle immersioni "Turtle Facial ID", vengono scattate foto di tutte le tartarughe che troviamo, possibilmente di entrambe le guance e poi una dall'alto che riprende la figura completa: carapace, testa, coda e pinne.

Quindi, dopo una sessione teorica in cui impariamo cosa fare, indossiamo la nostra attrezzatura e saliamo in barca per il breve viaggio verso il sito di immersione prescelto. Ste porta la macchina fotografica, mentre Anne ha una lavagnetta dove registrerà vari metadati relativi a ogni tartaruga: la specie (verde o hawksbill, le due specie più comuni da queste parti), la profondità, la taglia stimata (S, M, L), il sesso (i maschi hanno una coda lunga, a volte più delle pinne posteriori) e il comportamento, cioè cosa stanno facendo quando le vediamo (a riposo, nuotare, nutrirsi...). La difficoltà principale risulta essere quella di scattare buone foto che possano essere utilizzate dal software: devono essere perpendicolari al muso della tartaruga e piuttosto ravvicinate, in modo che il muso stesso occupi la maggior parte della foto (lo zoom non è consentito perché causa perdita di qualità e pixelatura). Perché è difficile? Perché le tartarughe sono vive e il più delle volte si allontanano nuotando quando Ste si avvicina con la macchina fotografica. Avremo bisogno di più pratica per perfezionare la tecnica. 😃 Immersione fantastica, se non fosse per il fatto che la maggior parte delle tartarughe decide di farsi vedere solo alla fine, quando avevamo già ufficialmente interrotto l'attività di raccolta dei dati (si tratta di ricerche scientifiche, quindi è necessario rispettare parametri specifici).  

Un paio di giorni dopo siamo impegnati nell'immersione "Turtle Epibionts". Gli epibionti sono organismi che vivono in simbiosi con le tartarughe e possono avere un effetto positivo o negativo sulla loro salute. L'attività è piuttosto simile all'immersione di identificazione facciale, con l'aggiunta di dover fotografare il carapace delle tartarughe da diversi lati, mostrando la presenza di remore - pesci che si attaccano ad altri animali marini (tipicamente squali) - alghe, cirripedi e altri problemi come ferite o genericamente scheggiature sul carapace, ecc. Anche questa è un'attività divertente e molto interessante, con molti più avvistamenti rispetto alla prima volta: 17 registrati - anche se non tutti utilizzabili a causa della qualità delle foto, anche qui c'è molto spazio per migliorare - e 27 avvistamenti complessivi. 🤩 🐢

Ogni immersione di tartarughe è seguita da un'accurata sessione di inserimento dati su un laptop per registrare tutti i risultati e le informazioni raccolte durante l'immersione per un ulteriore esame da parte degli scienziati.


Nearly a week without a blogpost (between Taiwan and our arrival in Borneo)?! What's going on? We owe you a bit of an explanation - it's going to be a good one, we promise. Being a volunteer with tracc on Pom Pom Island means being involved every day in research projects and in marine conservation activities. As our first week here has been pretty packed, we've decided to split it up into two posts. So stay tuned.

One of the main branches of activities performed by tracc here on Pom Pom has to do with turtles and they take place both on land and under water.

1.) Turtle ID and monitoring

In order to keep track of the turtles living around Pom Pom and in the nearby islands, tracc is building a database using data that is collected by staff members and volunteers and then analyzed with the help of a software.

It has been discovered that the "patches" - technically called "scutes" - on the cheeks of a turtle are as unique to the specific individual as fingerprints are for humans. Therefore in the "Turtle Facial ID" dives, photos are taken of all the turtles we find, possibly of both cheeks and then one from top taking in the full figure: carapace, head, tail and flippers. 

So, after a theoretical session in which we learn what to do, we get into our diving gear and hop in the boat for the short trip to the selected divesite. Stef is carrying the camera, while Anne has a slate where she's going to record various metadata regarding each turtle: species (Green or Hawksbill, the two most common species around here), the depth, the estimated size (S, M, L), the gender (males have a long tail, at times longer than the back flippers) and the behavior, i.e. what they are doing when we see them (resting, swimming, feeding...). The main difficulty turns out to be taking good photos that can be used by the software: they need to be perpendicular to the turtle's face and pretty close up, so that the face itself occupies most of the photo (zooming is not allowed as it causes loss of quality and pixelation). Why is it difficult? Because the turtles happen to be alive and more often than not start swimming away when Stef approaches them with the camera. We'll need more practice to perfect the technique. 😃 Cool dive, but for the fact that most turtles decide to turn up only at the end of the dive once we had already officially stopped the data collecting activity (keep in mind, these are scientific researches, and therefore specific parameters need to be obeyed).  

A couple of days later we are engaged in the so called "Turtle Epibionts" dive. Epibionts are organisms that live in symbiosis with the turtles and can have a good or bad effect on their health. The activity here is somewhat similar to the Facial ID dive, with the added task to take photos of the turtles carapace from different sides showing the presence of remoras - fish attaching themselves to other marine animals (typically sharks) - algae, barnacles and other issues like wounds or generically chips on the carapace etc. Also this is a fun and very interesting activity, with many more sightings than the first time: 17 registered - albeit not all usable due to the photo quality, also here there's a lot of space for improvement - and 27 sightings overall. 🤩 🐢

Each turtle dive is followed by a thorough data entry session on a laptop to record all findings and information collected during the dive for further scrutiny by scientists.


2.) Schildkröten an Land

In Aufgaben, die die Schildkröten an Land betreffen, sind wir zwar etwas weniger aktiv eingebunden, cool sind sie dennoch!

Schildkrötenspaziergang: Jeden Abend um 22 Uhr macht eine Gruppe von Freiwilligen und Mitarbeitern einen Rundgang über die Insel (etwa 40-45 Minuten ohne Unterbrechungen), um nach Nestern mit Eiern oder nach Schildkröten, die gerade Eier legen, zu suchen. Im ersten Fall werden die Eier sorgfältig eingesammelt und in eine Brutstation in einem nahe gelegenen Resort gebracht, wo sie ohne Gefahr, gestört oder zerstört zu werden, sich bis zum Schlüpfen entwickeln können. Warum? Pom Pom ist keine "wilde" Insel und es gibt zwar nicht viele natürliche Raubtiere, dafür aber Gäste der verschiedenen Hotels und auch Wilderer stellen eine erhebliche Gefahr für die Tiere dar. Im zweiten Fall warten wir eine Weile. Wenn die Schildkröte schnell ist, werden die Eier direkt eingesammelt und in die Brutstation gebracht. Wenn es langsam geht (kann mehrere Stunden dauern), wird die Stelle für den nächsten Tag markiert.

Freilassen von Schildkröten: Diese "Aktivität" ist eigentlich gar keine Aktivität, sondern reines Vergnügen. Sobald die Eier in der Station geschlüpft sind, werden die neugeborenen Schildkröten an den Strand gebracht, wo sie zu Sonnenuntergang freigelassen werden. Im Sand wird eine Sicherheitszone abzeichnet, und die kleinen Schildkröten werden einige Meter vom Wasser entfernt aus einem Eimer entlassen, das sie aus eigener Kraft erreichen müssen. In der ersten Woche haben wir das Glück, zwei dieser Wassergänge mitzuerleben, und es ist immer unglaublich schön und süß, die Kleinen dabei zu beobachten, auch wenn oft schon klar ist, welche der Kleinen keine große Überlebenschance haben werden. Nur etwa eine von 1000 wird das Erwachsenenalter erreichen!

Und das war's dann auch schon mit den Schildkröten. Unser nächster Beitrag wird sich um unsere Aufgaben Fische und Korallen betreffend drehen.


2.) Tartarughe a terra

Le attività a terra legate alle tartarughe hanno un coinvolgimento meno attivo per noi, ma sono comunque molto interessanti.

Turtle walk: ogni sera alle 10, un gruppo di volontari e membri dello staff fa il giro dell'isola (ci vogliono circa 40-45 minuti senza interruzioni) per cercare nidi con uova o tartarughe che depongono le uova. Nel primo caso le uova vengono raccolte con cura e portate in un "incubatoio" - situato all'interno di un vicino resort - perché possano svilupparsi senza il rischio di essere disturbate o distrutte. Questo perché Pom Pom non è un'isola "selvaggia" e, sebbene non ci siano molti predatori naturali, gli ospiti dei due resort presenti sull'isola potrebbero rappresentare una minaccia sostanziale per loro, così come i bracconieri. Nel secondo caso si aspetta un po'. Se la tartaruga è veloce e torna in mare, si procede a raccogliere le uova, se le cose vanno per le lunghe (potenzialmente parliamo di diverse ore), si marca il posto e si torna il giorno dopo.

Rilascio delle tartarughe: questa "attività" in realtà non è affatto un'attività, ma un puro divertimento. Una volta schiuse le uova nell'incubatoio, le tartarughe appena nate vengono raccolte e portate sulla spiaggia per essere liberate. Viene tracciata una zona sicura sulla sabbia e le tartarughine vengono fatte uscire da un secchio a pochi metri dall'acqua, che devono raggiungere con le proprie forze. Nella prima settimana abbiamo la fortuna di assistere a due rilasci ed è sempre incredibilmente bello da vedere, anche se spesso è abbastanza chiaro quali delle piccole non avranno molte possibilità di sopravvivenza. Solo 1 su 1000 raggiungerà l'età adulta!

E questo è tutto per quanto riguarda le tartarughe. Il prossimo post sarà dedicato alle nostre attività con pesci e coralli.


2.) Turtles on land

Turtle related activities on land have less of an active involvement for us, but they are pretty cool nonetheless. 

Turtle walk: every evening at 10, a group of volunteers and staff members makes a tour around the island (it takes about 40-45 minutes without interruptions) to look for nests with eggs or for turtles laying eggs. In the first case the eggs are carefully collected and brought to a "hatchery" - located inside a nearby resort - to hatch without risk of being disturbed or destroyed. This is done because Pom Pom is not a "wild" island and although there aren't many natural predators, the guests of the couple of resorts present on the island could pose a substantial threat for them as could poachers. In the second case we wait for a while. If the turtle is quick, we proceed with collecting the eggs, if things are slow (can take several hours) the place is marked for coming back the next day.

Turtle release: this "activity" is actually no activity at all, but pure enjoyment. Once the eggs in the hatchery have hatched, the newly born turtles are collected and brought to the beach to be released. A safe zone is traced on the sand and the little turtles are let out of a bucket a few meters from the water edge, which they need to reach with their own strength. In the first week we are lucky enough to witness two releases and it's always incredibly nice to see, even if it is often quite clear which of the little ones won't have much of a chance of survival. Only about 1 out of 1000 is going to reach adulthood! 

And this is about it concerning turtles. Our next post is going to be dedicated to our activities with fish and corals.

Die Brutstation // L'incubatoio // The hatchery